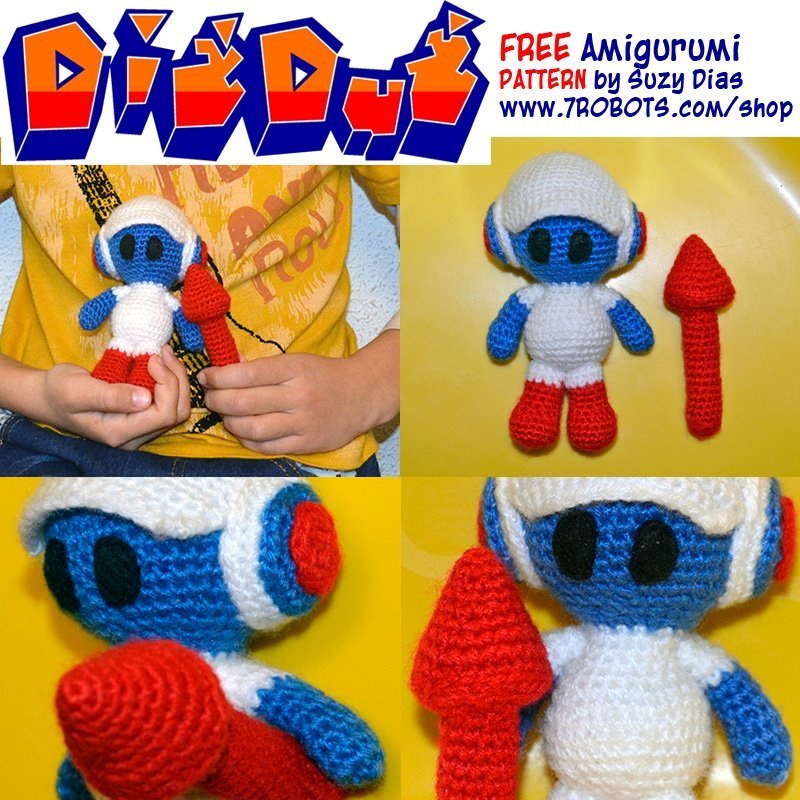


• Height: 5” (12.7 cm)
• Yarn: DK / Light Worsted Weight (red, white and blue)
• Hook: 2.5mm (B1). You can use up to a 3.5mm hook (E4) for a larger size.
• Yarn Needle
• Small amount of black felt for the eyes and black thread to sew them on
Abbreviations: R – Round, MR – magic ring, ST/STS – stitch/stitches, SC – single crochet, INC – 2 single crochets (SC) in the same stitch, INVDEC – invisible decrease, EVEN – SC 1 in each ST around (the stitch count remains the same), x – times to repeat items listed in [brackets]
HEAD
* The head and body are created in continuous rounds.
* Use blue yarn to begin.
R1: MR, SC 6 (6)
R2: INC around (12)
R3: [SC 1, INC] around (18)
R4: [SC 2, INC] around (24)
R5: [SC 3, INC] around (30)
R6: [SC 4, INC] around (36)
R6: [SC 5, INC] around (42)
R8-15: EVEN (42)
R16: [SC 4, INVDEC] around (36)
R17: [SC 3, INVDEC] around (30)
R18: [SC 2, INVDEC] around (24)
R19: [SC 1, INVDEC] around (18)
R20: [SC 4, INVDEC] around (15)
R21: [SC 2, INVDEC] around (18)
* Stuff and shape the head now. You can also add more stuffing over the next couple rows.
** Continue working in rounds to begin the body with R22…
BODY
*The body begins here. Switch to white yarn.
R22: [SC 2, INC] around (24)
R23-25: EVEN (24)
R26: [SC 3, INC] around (30)
R27: [SC 4, INC] around (36)
R28-30: EVEN (36)
R31: [SC 4, INVDEC] around (30)
R32: [SC 3, INVDEC] around (24)
R33: [SC 2, INVDEC] around (18)
* Stuff and shape the neck and body. You can also add more stuffing over the next couple rows.
R34: [SC 1, INVDEC] around (12)
R35: [SC 1, INVDEC] around (8)
R36: INVDEC twice.
* F/O and weave in ends.
LEGS (make 2)
* Using red yarn.
R1: MR, SC 6 (6)
R2: INC around (12)
R3: [INC, SC 1] around (18)
R4-6: EVEN (18)
R7: [INVDEC, SC] x 4. SC 1 in the next 6 STS (14)
R8: [INVDEC, SC] x 3. SC 1 in the next 5 STS (11)
R9-11: EVEN (11)
R12-13: Switch to white yarn. EVEN around (11)
* F/O and leave a long tail for sewing to the body.
ARMS (make 2)
* Using blue yarn.
R1: MR, SC 6 (6)
R2: INC around (12)
R3: [INC, SC 1] around (18)
R4: EVEN (18)
R5: Switch to white. EVEN around (18)
R6: [SC 1, INVDEC] around (12)
R7: EVEN (12)
* F/O and leave a long tail for sewing to the body.
** Very lightly stuff hand. I’d recommend not stuffing the arm, or stuffing it extremely lightly. I added a bit too much – oops!
ASSEMBLY OF THE BODY
1. Pin the legs in place and sew them on. Weave in ends.
2. Pin the arms in place and sew them on. Weave in ends.
TIP: Only sew the eyes on after the helmet is in place.
HELMET
*Using white yarn.
R1: MR, SC 6 (6)
R2: INC around (12)
R3: [SC 1, INC] around (18)
R4: [SC 2, INC] around (24)
R5: [SC 3, INC] around (30)
R6: [SC 4, INC] around (36)
R6: [SC 5, INC] around (42)
R7: [SC 6, INC] around (48)
R8-18: EVEN (48)
* Now we’ll create the visor at the front of the helmet.
R19: CH1, TURN, SC 18.
R20: CH1, TURN, INVDEC, SC 16, INVDEC.
R21: CH1, TURN, INVDEC, SC 14, INVDEC.
* F/O and weave in ends.
HELMET SIDE CIRCLES (make 2 sets)
*To create the sides of the helmet, create 3 circles: a base, middle and top, then sew them together.
1) TOP: RED CIRCLE
R1: MR, SC 6 (6)
R2: INC around (12)
* F/O and leave a tail for sewing to “Middle: Blue Circle”.
2) MIDDLE: BLUE CIRCLE
R1: MR, SC 6 (6)
R2: INC around (12)
R3: [SC 1, INC] around (18)
R4: [SC 2, INC] around (24)
* F/O and leave a tail for sewing to the “Base: White Circle”.
3) BASE: WHITE CIRCLE
R1: MR, SC 6 (6)
R2: INC around (12)
R3: [SC 1, INC] around (18)
R4: [SC 2, INC] around (24)
R5: [SC 3, INC] around (30)
R6: EVEN (30)
* F/O and leave a long tail for sewing to the helmet.
* Once the “Top: Red Circle” is sewn to the “Middle: Blue Circle”, sew the blue to the “Base: White Circle”.
ASSEMBLY OF THE HELMET EYES
1. Once you place the helmet on the head, pin the side, put the helmet securely on the head.
2. Pin the side circles to the left and right side of the helmet. Sew them in place. I secured the helmet to the head so it wouldn’t come off, using the same white yarn tail. This is optional since you may prefer a removable helmet.
3. Cut ovals out of black felt and sew them on with thread.
DRILL
To create the drill, crochet 3 parts: the cone, the base (circle) for the cone, and the handle.
1) DRILL: CONE
* Using red yarn.
R1: MR, SC 4 (4)
R2: [INC, SC 1] around (6)
R3: [INC, SC 2] around (8)
R4: [INC, SC 3] around (10)
R5: [INC, SC 4] around (12)
R6: [INC, SC 2] around (15)
R7: [INC, SC 3] around (18)
R8: [INC, SC 4] around (22)
R9: [INC, SC 5] around (26)
* F/O and hide the tail inside the cone.
2) DRILL: CONE BASE (Circle)
R1: MR, SC 6 (6)
R2: INC around (12)
R3: [INC, SC 1] around (18)
R4: [INC, SC 1] x8, SC 2 (26)
* F/O and leave a tail for sewing to the cone.
3) DRILL: HANDLE
R1: MR, SC 6 (6)
R2: INC around (12)
R3: BLO, EVEN (12)
R4-13: EVEN (12)
* Stuff every now and again as you proceed. Instead of stuffing, I used bits of extra red yarn.
* F/O and leave a tail for sewing to the cone base.
ASSEMBLY OF THE DRILL
1. Sew the “Drill: Cone Base” circle to the bottom of the cone. After the first few stitches, stuff the cone firmly. Sew the rest, F/O and weave in ends.
2. Securely sew the “Drill: Handle” to the “Drill: Cone Base”.
TIP: Use sew on snap fasteners so you can attach and remove the drill from Dig Dug’s arm. Kids will enjoy this extra feature.
Here are a few basic videos that you may find helpful:
– Magic Ring: https://www.youtube.com/watch?v=sLUaywX0-WE
– Crochet ball: https://www.youtube.com/watch?v=mJ47MLlrLzw